How To Hibernate Windows 8
Here is a short tutorial on how to hibernate Windows 8.
Windows 8 arrived with lot of modifications and changes in its design and interface. While the new Metro look was an eye-candy for most of the users, some found it difficult to locate simple things like how to Shutdown Windows 8 or search for an app on the system. Even the Hibernate option is missing, which is probably an important feature for many of us.
Hibernate is a state in which the computer saves its current state from RAM to a hard disk or some other non-volatile media before shutting down the PC. On restart, it automatically loads the running programs and open windows from the last session and they appear just as they were when the computer was Hibernated.
If you also want to get the Hibernate option back on your Windows 8 system, follow this step by step tutorial. No need to install anything; just a simple setting in your system can enable the Hibernate option back on your Windows 8 PC. Let’s see how to do it.

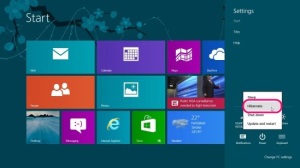
- Click on Win+I key combination to bring the Settings flyout.

- Click on Control Panel (second option from top).
- Click on System and Security.

- Click on Power Options.

- Click on “Choose what the Power Buttons do” from the left panel.

- Click on “Change Settings that are currently unavailable”.

- Scroll down to the bottom and check “Hibernate” option under the Shutdown Settings section.

- Click on “Save Changes” button to apply changes.
That’s it! The next time you click on the Power button on the Windows 8 Settings Charm, you would see the Hibernate option listed on the Power menu.
Hope this tutorial would be of help for you. Keep visiting Windows8Freeware for more interesting How To’s and Free Apps. Don’t forget to share your suggestions and feedbacks in comments.