How To Enable 64-Bit Mode In Internet Explorer 10 On Windows 8
Here is how to enable 64-Bit mode in internet explorer on Windows. The world is moving from 32-bit platform to 64-bit platform, and it has several advantages too. Here is how you can enable 64-Bit mode in internet explorer 10 in Windows 8.
Microsoft released Internet Explorer 9 in two versions: 32-bit version and 64-bit version. However, both of them were released separately, and one could install both of them in his/her PC. In Internet Explorer 10, the 32-bit and 64-bit versions are consolidated into a single app. That means, you can install Internet Explorer 10 and then you can enable its 32-bit or 64-bit variant depending on your preference. By default, the 32-bit variant is enabled, and you can enable the 64-bit variant by going through the following steps.
Open internet explorer and click on the “gear” shaped icon on the extreme right or use the keyboard shortcut Alt +X. From the pop-up menu, click “Internet Options”.


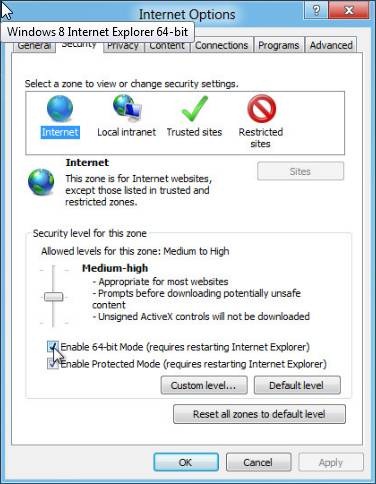
This will open the Internet Options dialog box. Click on the “Security” tab. Here you can select a zone for which you want to customize the security setting. For example, you can enable 64-bit mode for “Internet” or for “Local intranet ” and so on. After selecting the desired zone, click on “Enable 64-bit mode” at the bottom. You are required to restart internet explorer in order to apply the settings.