How To Change The Icons Of Windows 8 Metro Tiles
Here is a Windows 8 tutorial on how to change the icons of Windows 8 Metro tiles found over the start screen. Yupp…you read it correct. You can customize the icons according your preferences and change the icons of all the Metro tiles you have in your Windows 8 Start screen.
Now, without eating your time in other not so important talks, let me quickly point down the steps required to change the icons of Windows 8 metro tiles. Lets get started:
How To Change The Icons Of Windows 8 Metro Tiles:
- Head over to the Start screen. Right-click on a Metro tile, the tile of which you want to change the icon. For example: I chose “Control Panel”. You will quickly be displayed with a context menu at the bottom of the screen.

- Now, from the context menu, click on “Open File Location”.
- This will bring you the location where you can find the shortcut of the file. Right-click on the shortcut of the selected icon.

- Click on “Properties” option from the pop-up menu,
- Now, click on the “Shortcut” tab?”Change Icon”.
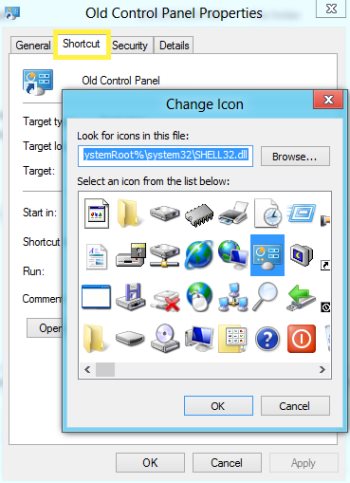
- You will soon find a complete list of different beautiful icons. You can now select one of the displayed ones to change the icon of the selected tile.
- Once selected, click on “OK”
- Once again click on “Ok”
Yupp…there you are. now if you switch back to the start screen and check the selected tile that you have recently modified, you will find the all new icon customized by you. Take a look over mine:

Check out more Windows 8 Tutorials posted by us.
Go ahead and follow these simple steps to change the icons of Windows 8 metro tiles now…